How To Build a Marketplace MVP in No-code – The Discourse #32
Step-by-step guide to creating a directory listing with tools recommendations and a real example
✨ Some personal news before we begin ✨
I’ve joined the inaugural cohort of On Deck's No-Code Fellowship Program (ODNC1) What's On Deck? On Deck is recreating Silicon Valley in the cloud, with fellowship programs for Founders, Angel Investors, Writers, Podcasters, and many more. If you’re interested in learning more about my experience of the program, I am chronicling the 10-week program in this newsletter. Please subscribe! With that said, let's start with the 32nd edition of The Discourse.
If you’re new here, please subscribe and get insights about product, design, no-code delivered to your inbox every week.
If you're a founder or an indie maker, your goal is to provide significant value to the customer in the least possible time. This is especially true when validating a problem, as MVPs can come to great use.
You might think that code will be the best way to build an MVP, but code is expensive and requires technical skills.
The goal of an MVP is for you to learn from customers. Instead of spending months building something that doesn’t have a need, you can build something worthwhile in a day that can help you understand the customer’s need better.
In this example, we're going to talk about how to make a marketplace MVP in no-code.
Marketplaces have many use cases:
Shopping - Any Shopify Site
Curation of Products - Product Hunt
Job Board - Indeed
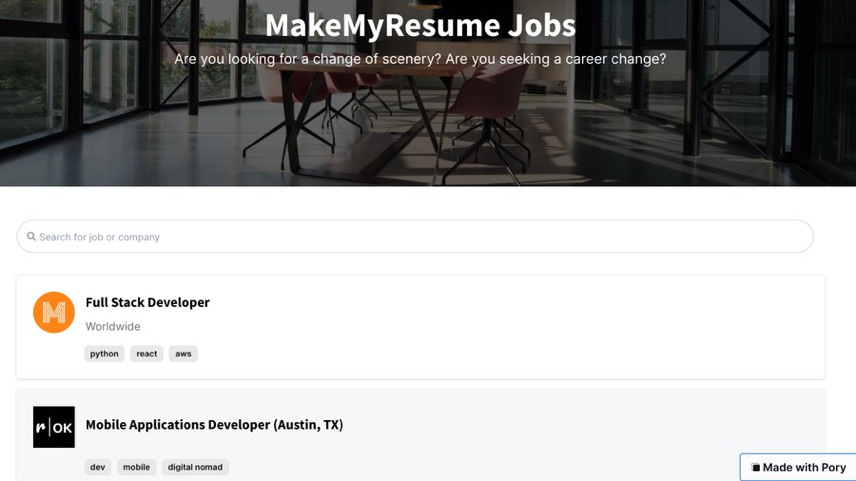
I built a remote job board in 45 minutes with no-code tools. Let's see how it was done:
Understand the use case
First, figure out what problem you are trying to solve.
What kind of value will it add to your customers or your business? What are the success metrics that you would like to track? What's the hypothesis that will define the success of this MVP?
I co-founded MakeMyResume, a career-services venture, where we offer services related to resume writing, profile creation, and job application. One thing that we didn’t assist in was direct access to jobs. And this was one of the most frequently requested offerings.
One positive impact of COVID-19 is that it has opened up the market for remote jobs. So I knew that connecting our customers to remote jobs would be of great value.
Figure out the No-code Stack
Find a data source
Data for your marketplace can either be created manually or sourced. This can be either done by you or someone in your team or curated by your customers through a form.
If you want to go with the automated route, you can automatically pull in data through an API or an RSS feed.
Going back to the remote job board example, I went searching for an API on Product Hunt. I came across a post by RemoteOK, the world's largest repository of remote jobs, created by Pieter Levels. They had an API and an RSS feed to pull in all the data from jobs listing and display it wherever you want.
Connect the source to your data
Now that you have found your data source, you need a way to pull in data from that source into a database of your own. Code is a more efficient way of implementing this if you have the technical skills. But assuming you don’t, I find a combination of Zapier (connector) and Airtable (database) to be useful tools to achieve this.
If you're doing it manually, you can have a Google Form, Airtable Form, or Typeform as the input method.
I looked at Zapier and they had a Zap to trigger a new item in an RSS feed. What this means is that whenever a new item is added to an RSS feed, it can trigger an operation that updates its destination database.
Create your database
A database is nothing but a repository of information — like an Excel or Google Sheet.
You will have to create the fields that match the data you're trying to get from a Google Form, Typeform, Airtable Form, or through an API or Zapier.
As for me, I created the fields for unique ID, Title, Company, Description, Tags, and Location to match the incoming RSS feed.
After setting up the Airtable, I connected it with Zapier and the data started pulling in successfully.
Create the Frontend
Once you've created the backend, you now need to display the information to the customers. The best part of these tools like Airtable and Google Sheets is that people have built services that take an ugly database and display it in aesthetic frontends.
Pory is one example that I know of. There are others like softr.io, SheetstoSites, and Glide that do the same thing. And they offer templates for different use cases like a marketplace, directory listing, events listing, etc.
For the remote job board, I used their Job Board template. I didn’t have to do much after that, I modified the layout and fields to my liking. And connected it to my data source.
And voila! The Job board is ready to test with real users, all just in 45 minutes.
You can check out the final result at mmrjobs.pory.app
Getting Feedback
The final step is to get feedback from customers by asking them to try and test. They will tell you what you need to know. What is good, what worked, and what doesn’t work.
📘 Read of the week: Why Content is King - Divinations
That's it for today, thanks for reading! Press the ♥️ button if you liked this edition. Have any questions? Leave a comment below, and I'll be happy to answer them.
Talk to you soon!
— Kavir
P.S. Hit the subscribe button if you liked it! You’ll get insightful posts like this directly in your email inbox every week.


